An Azure static website is one of the cheapest ways to host a marketing site, a documentation portal or a blog. However, copying files by hand does not scale. For example, every manual upload risks a missed file, a wrong content type or a stale cache. So in this guide you will build a pipeline in Azure DevOps that builds your site, uploads it to Azure Blob Storage and refreshes the cache, with no stored passwords or keys.
Key takeaways
- Host the built site in the $web container and let Azure serve it directly.
- Use a workload identity federation service connection, so the pipeline holds no secret that can leak or expire.
- Give the identity the Storage Blob Data Contributor role, so uploads work with Microsoft Entra sign-in instead of an account key.
What is an Azure static website?
An Azure static website is a set of built files, such as HTML, CSS and JavaScript, that Azure Blob Storage serves straight from a special container named $web. Azure gives the site a public web endpoint, so you run no web server. A pipeline can then repeat the upload each time your code changes.
How the pipeline fits together
The flow has four moving parts. First, a push to the main branch starts Azure Pipelines. Then the build stage compiles the site and publishes the output folder as an artifact. Next, the deploy stage signs in to Azure through a service connection and uploads the artifact to the $web container. Finally, an optional step purges the Azure Front Door cache so visitors see the new version.
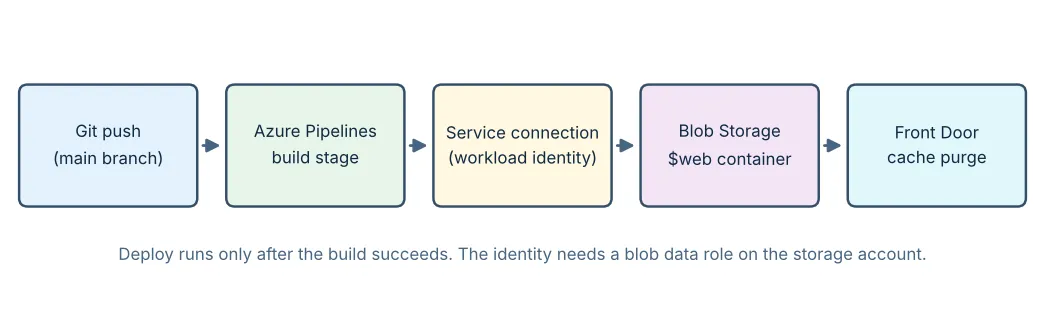
Figure 1: The pipeline from Git push to a live Azure static website. Source: our own diagram.
You will complete four steps:
- Create the storage account and turn on static website hosting.
- Create a service connection that stores no secrets.
- Add the pipeline file to your repository.
- Purge the Front Door cache and verify the live site.
Why automate the deployment?
Manual uploads fail in quiet ways. For example, a developer drags the new pages into the container but forgets the updated CSS file, so the home page loads without its styling. In our experience, a missing role assignment is the most common reason a first automated run fails, and it is also the easiest to fix.
However, a continuous integration and continuous delivery (CI/CD) pipeline removes both problems. Because every release runs the same steps in the same order, a release no longer depends on one person's memory.
“Every secret you remove from a pipeline is one less thing to rotate, leak or forget.” — Platform engineer, Sloud Solutions
Before you start
- An Azure subscription and permission to create a storage account and assign roles.
- An Azure DevOps project that holds your site's code, plus a build command that writes the finished site to a folder such as dist.
- Service connection administrator rights in Azure DevOps, or someone who can approve the connection for you.
- A current Node.js long-term support (LTS) release if your site uses a JavaScript build, and the Azure command-line interface (CLI) to run the commands locally.
Step 1: Create the Azure static website
First, create a general-purpose v2 storage account in a resource group. Then turn on static website hosting. Note that storage account names must be globally unique, lowercase and 3 to 24 characters long.
Figure 2 shows the result. Enabling the setting makes Azure create the $web container, and Azure then serves your index and 404 pages from it.
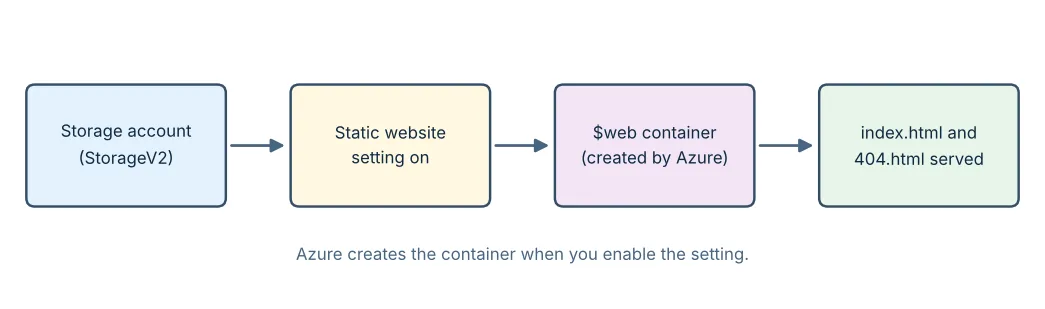
Figure 2: What Azure sets up when you enable static website hosting. Source: our own diagram.
az group create --name rg-static-site --location centralindia
az storage account create --name stsloudstatic001 --resource-group rg-static-site --location centralindia --sku Standard_LRS --kind StorageV2 --min-tls-version TLS1_2
az storage blob service-properties update --account-name stsloudstatic001 --static-website --index-document index.html --404-document 404.html --auth-mode login
Note: the last command uses Microsoft Entra sign-in, so your own account needs Storage Blob Data Contributor on the storage account first.
Azure creates the $web container for you. After that, files in it are served anonymously and are case-sensitive, so About.html and about.html are different pages. Next, read the primary endpoint with this command:
az storage account show --name stsloudstatic001 --query "primaryEndpoints.web" --output tsv
Step 2: Create a service connection without stored secrets
In Azure DevOps, open Project settings, then Pipelines, then Service connections. Then create an Azure Resource Manager connection that uses workload identity federation. You can use an app registration or a user-assigned managed identity for it. Azure DevOps proves who it is with a short-lived token, so no client secret is stored or rotated.
Figure 3 shows the chain. First, the pipeline run presents a token to the service connection. Then the connection maps to a Microsoft Entra identity. Finally, that identity holds one role on the storage account.
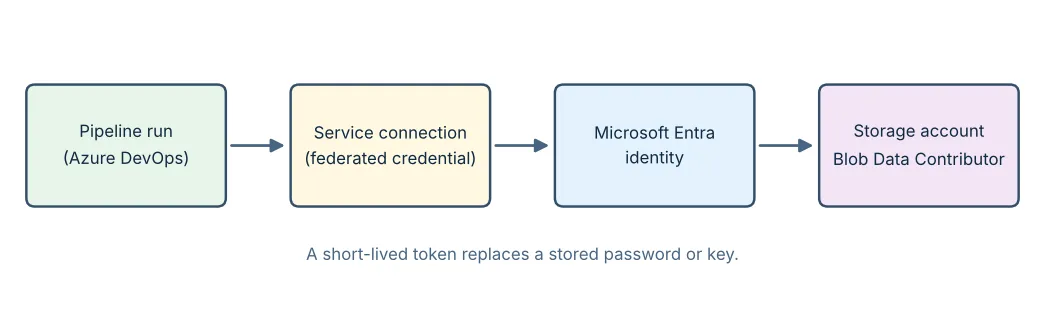
Figure 3: How the pipeline proves who it is without a stored secret. Source: our own diagram.
Azure DevOps and Azure permissions are separate, so an Azure or Entra administrator may need to add the federated credential for you. For the exact steps, see Microsoft's guide to configuring a workload identity service connection for the full list of permissions.
However, new connections use the Microsoft Entra issuer by default. According to Microsoft's documentation at the time of writing, connections that still use the older Azure DevOps issuer are deprecated and retire on 1 July 2027. So convert old connections instead of creating replacements.
The same no-stored-keys idea also applies on AWS. For example, our post on GitHub Actions and OpenID Connect for AWS shows how short-lived tokens replace access keys there.
Tip: do not select Grant access permission to all pipelines. Instead, authorize only the pipeline that needs the connection.
Give the identity upload permission
Next, give the identity permission to upload. Assign the Storage Blob Data Contributor role on the storage account only, not on the whole subscription:
az role assignment create --assignee "<client-id>" --role "Storage Blob Data Contributor" --scope "/subscriptions/<subscription-id>/resourceGroups/rg-static-site/providers/Microsoft.Storage/storageAccounts/stsloudstatic001"
Note: role assignments can take a few minutes to apply, so wait before the first run.
Step 3: Add the pipeline
Add an azure-pipelines.yaml file to the root of your repository to define the Azure DevOps pipeline. First, the build stage produces an artifact called site. Then the deploy stage uploads it. Before you run it, replace the service connection name, storage account name and site address with your own.
Figure 4 shows the two stages. The build stage creates the artifact, the deploy stage uploads it, and a smoke test then checks the live site.
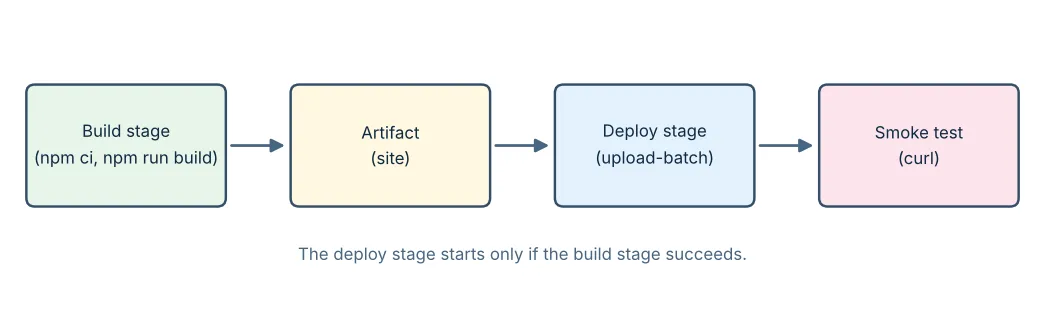
Figure 4: The build and deploy stages of the Azure DevOps pipeline. Source: our own diagram.
The build stage
trigger:
  branches:
    include:
      - main
pool:
  vmImage: ubuntu-latest
variables:
  storageAccount: stsloudstatic001
  siteUrl: https://www.example.com
stages:
  - stage: Build
    jobs:
      - job: BuildSite
        steps:
          - task: NodeTool@0
            inputs:
              versionSpec: '24.x'
          - script: |
              npm ci
              npm run build
            displayName: Build the site
          - publish: $(System.DefaultWorkingDirectory)/dist
            artifact: site
The deploy stage
The deploy stage uses the Azure CLI task so every command runs with the identity from your service connection. Because it is a deployment job, it also gives you an environment where you can add approvals before production. Next, add this block directly below the build stage, with the same indentation.
  - stage: Deploy
    dependsOn: Build
    condition: succeeded()
    jobs:
      - deployment: DeploySite
        environment: production-static-site
        strategy:
          runOnce:
            deploy:
              steps:
                - task: AzureCLI@2
                  displayName: Upload to the $web container
                  inputs:
                    azureSubscription: sc-static-site
                    scriptType: bash
                    scriptLocation: inlineScript
                    inlineScript: |
                      az storage blob upload-batch \
                        --account-name $(storageAccount) \
                        --source $(Pipeline.Workspace)/site \
                        --destination '$web' \
                        --overwrite true \
                        --auth-mode login
                - script: curl --fail --silent --show-error --location "$(siteUrl)" --output /dev/null
                  displayName: Smoke test the live site
The upload-batch command copies every file in the artifact into $web. Also, it sets the content type from the file extension for common file types. With --overwrite true it replaces existing blobs, but it does not delete files you removed from the site. So delete stale blobs with az storage blob delete-batch, or deploy into an empty container.
Set cache headers for fingerprinted assets
Files whose names change with every build, such as hashed CSS and JavaScript, can be cached for a year. Next, run a second upload for that folder after the main upload and set the Cache-Control header. However, keep HTML pages on a short cache so new releases show up quickly.
az storage blob upload-batch \
  --account-name $(storageAccount) \
  --source $(Pipeline.Workspace)/site/assets \
  --destination '$web' \
  --destination-path assets \
  --content-cache-control "public, max-age=31536000, immutable" \
  --overwrite true \
  --auth-mode login
Step 4: Purge the cache and verify the release
If Azure Front Door sits in front of your storage account, visitors can keep seeing cached files after a release. So add a step that purges the endpoint. Microsoft's cache purge guide for the Azure CLI notes that purges ignore query strings and can take up to 10 minutes to reach every edge location.
Figure 5 shows where the cache sits. Visitors reach Front Door first. Front Door then reads from the static website endpoint, which serves the files in $web.
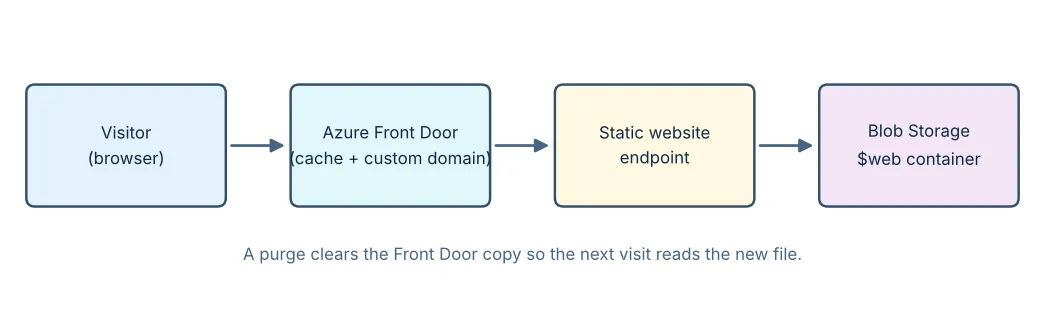
Figure 5: Where the cache sits between visitors and your Azure static website. Source: our own diagram.
az afd endpoint purge --resource-group rg-static-site --profile-name afd-sloud-site --endpoint-name site-endpoint --domains www.example.com --content-paths "/*"
The pipeline identity needs a role on the Front Door profile that allows purging, for example Contributor on that profile. Note that the static website endpoint does not provide HTTPS for a custom domain by itself. For that, Microsoft's static website documentation points to Azure Content Delivery Network (CDN). Alternatively, Azure Front Door can act as the front end.
The smoke test in the deploy stage fails the pipeline when the site address does not return a successful response. So a broken release never looks like a success. After the first run, check three things on your Azure static website by hand. First, the home page should load. Second, a missing page should show your 404 page. Third, a CSS file should load with the text/css content type.
Troubleshooting
Error | Likely cause | Fix |
|---|---|---|
AuthorizationPermissionMismatch | The identity has no blob data role | Assign Storage Blob Data Contributor on the storage account and wait a few minutes |
ContainerNotFound for $web | Static website hosting is not enabled | Run the service-properties update command from Step 1 |
Page not found at the site address | Files uploaded into a sub-folder, or a different file name case | Upload the folder contents to the container root and match the file name case exactly |
Browser downloads index.html instead of showing it | Wrong content type on the blob | Re-upload the file so the type is text/html |
Pipeline cannot use the service connection | The pipeline is not authorized for the connection | Authorize that one pipeline for the connection |
Old content after a deployment | Cached copies at the edge or in the browser | Purge the Front Door cache and review your cache headers |
Common mistakes to avoid
- Storing a storage account key or shared access signature (SAS) token as a pipeline secret. Use the service connection with Microsoft Entra sign-in instead.
- Granting every pipeline access to the service connection. Instead, authorize pipelines one at a time.
- Giving the identity Owner on the subscription. Instead, scope Storage Blob Data Contributor to the one storage account.
- Forgetting that upload-batch never deletes old files, so removed pages stay live until you delete them.
Frequently asked questions
Can I use a custom domain with HTTPS?
Yes, but not on the static website endpoint alone. Put Azure CDN or Azure Front Door in front of it, then attach your domain and certificate there.
Do I need a storage account key in the pipeline?
No. Because the workload identity federation service connection and --auth-mode login handle sign-in, the pipeline signs in with Microsoft Entra and never handles a key.
Does upload-batch delete files I removed from the site?
No. It only adds and overwrites files. So delete stale blobs with az storage blob delete-batch, or deploy into a clean container.
Conclusion and next steps
An Azure static website needs three things to deploy safely: a storage account with static website hosting enabled, a service connection with no stored secrets, and a pipeline that uploads, purges and tests. First, start with the storage account and one manual upload. Then move the same commands into the pipeline.
Read more in our blog, see how we work with clients, or talk to our team about your project.
About the author
Sloud Solutions is a cloud engineering team that builds and reviews delivery pipelines for engineering teams. Connect with Sloud Solutions on LinkedIn.
Reviewed by the Sloud Solutions cloud engineering team.